
What you need to film online classes or demonstrations

filming equipment photos
Hello!
(You should go make a tasty beverage; this is a LONG article.)
I am regularly asked for advice on what equipment and software I use to film my Skillshare classes and other demonstrations. Today, I thought I'd write up an article about it, that way I can point to it easily and you can bookmark it for reference.
First things first: I have been a Top Teacher on Skillshare for years, and I use almost the exact same equipment as when I started. I have made few upgrades, but I have always managed a pretty good look and sound for my videos. My way is certainly not the only way, but should help you form your own workflow.
The TL;DR takeaway is this: good audio and good light are your most important investments; you will need to buy things, but they need not be expensive and you can build over time.
First, let's talk about lighting.
Natural daylight is fickle. It's sunny, it's not, it's winter, it's night, it's not something you can count on, so don't. I know teachers who film only at night so that they can control their lighting totally. You must, invest in light. Fortunately, we're in a time when LED photography lights are very affordable, meaning that for about £100 you can get a good light or two. You're going to want a couple of lamps for balance, and if you've got the budget, a ring light is great for illuminating yourself, if you talk to the camera in your work. As of writing this, I use two Neewer LED panels with barn doors, and they are adjustable for brightness. Model number: NL-660, single colour, 5600k. They were a smidge over £100 each. This did not include stands.
Two very important things: get stuff in the 5000k range for the most neutral light (not cool, not warm, closest to daylight), and test your LEDs for flickering on camera. Cheap LEDs will often flicker when you watch the playback footage and dimmable lights are usually the worst for it. For this reason, stick to photography grade lamps as the risk is much lower for flicker. (I have had to reshoot clips in the past due to flickering that is only spotted on playback.)
If your budget is not allowing for ALL THE LAMPS (I have lots now, and could do with more... Light is so valuable.), then get one good one and get a photography reflector or at the very least, use a big sheet of white foam board to bounce and direct fill light around. (There are loads of videos and tutorials on using a single light and a reflector, and so I'll let you google that.)I film at all times of day, but sun in my studio is North, so that means no sunbeams shooting into my room. This is important as I don't have weird shadows to work around. If you're not so lucky, you will need heavy curtains or some way to block out the natural light for consistency. Optimise your environment for that, then you have a process you can rely on for consistent video results.
filming equipment photos
Related to lights, I film most of my top-down demonstration footage with an app that lets me change the white balance. Oh, yes, I film on an older iPhone 6s for most of my HD footage, and use an old iPad mini 2 as "b-roll" side angle footage. The app I use on the iPhone is called ProMovie (Panda Apps Limited) and it has so many useful settings. I don't remember what it cost, but I use it, it works, and I would only change one tiny thing about it, and that is that the movie files have to be retrieved as files via iTunes, so that's a little clunky but not a deal-breaker.
Summary so far: Get you some LED lamps. Two is great, more is better. I have the Neewer LED panels, a Neewer 18" LED ring light, two Daylight Company LED task lamps (which illuminate the desk as I work anyway), and a small LED angle poise lamp that fills a gap. This is all supplemented by an ENORMOUS LED ceiling light, which is the old equivalent of around 500w or something. It's crazy bright but very limited since it radiates out from the middle of the room. I use a lot of electricity when I film, but it's far less since I got away from traditional photography soft boxes and CFL bulbs. My investment in video and task lighting is approximately £100 per lamp, but it can be done a wee bit cheaper than that now.
Moving on to sound.
Briefly, so I don't forget to mention it, I record and edit my audio so that the volume is at a comfortable conversation level when I have my iMac set to 50% volume. That gives people the option to turn me up or turn me down. I listen to a lot of ASMR videos and there are so many that are recorded so loudly that even the lowest volume in headphones is conversation loudness. That's too much - remember, everyone has different preferences and may be listening on headphones or out loud, so how you capture the audio initially is crucial.I use a few things for audio, but mostly the workflow for the past year or two involves a Zoom H6 with a shotgun mic, positioned out of frame but near me, attached to a Gorillapod flexible tripod on my desk. That is my "proper" sound file, which gets matched up in iMovie to the audio captured with the iPhone 6s video. I typically get rid of the iPhone audio in editing. I have also used a Røde lavalier mic made for the iPhone, but the wire gets in the way when I'm demonstrating so I stick with the H6 for indoor, studio filming. If I need to record voiceovers, I set up just as though I need to film, to keep the new audio as similar to the existing as possible.When filming the intro[duction] and outro, Pete assists and films me using a Canon dSLR with a Røde shotgun mic attached. This is to help me match footage with the master audio captured by the Zoom H6. dSLR audio is too far away, so gets thrown away in editing after I use it to match video to H6.
Sound is so important. Light is so important. If you get those two things right, you will have a video that is better than most of the stuff out there. Remember, lots of the really slick productions you are probably already comparing yourself to will have had a team of people and a much bigger budget. You can work miracles with a lot less, I assure you, and you can add gear as your budget allows.
Create a class or demonstration that YOU would watch, and you'll be fine.
Editing thoughts:
I edit everything in iMovie on an iMac. I have learned that when you hold down the option key when working with audio or video clips that you get finer control (like the ability to duck a single point instead of two... that will make sense when you're doing it). iMovie is totally capable of creating quality results and it's free on the Mac. I have no idea what you might use if you're on a PC, but there is lots to google, no doubt. iMovie will seem to have its limits, but after spending years and countless hours editing with it, I have little reason to change my workflow or learn new software at this time.Export video chapters or a whole demo to a big ol' file, then use Handbrake (free, open source, multi-platform), to crunch your edited chapters down to something manageable for upload. There are a bunch of presets in Handbrake, so chances are you won't even have to figure any of the technical stuff out. I have a custom preset I made for my work, but I had a few reasons for it. Chances are, you'll be fine with what's built in.
Music thoughts:
For the love of all that is holy, duck your audio and keep the volume of your theme tunes etc. low enough that if you are speaking at the same time the music is on, you are not competing with it. Nothing makes me want to turn off a demonstration video faster than obnoxious music making the presenter hard to hear. When I add a track to my intro and outro videos (I almost never add music to the internal chapters), I keep the volume low and duck it for when I speak. When I have music playing under my speaking voice track, it's ducked to about 2-4% of full volume so you can barely hear it, but it adds ambience and continuity. When it's allowed to be at its loudest, I keep it throttled to 20% or under. Yup, that low because it should support the presenter, not compete. If you cannot manage the audio, leave it out. Bad music track audio is worse than no music every time.
Where do I find music?
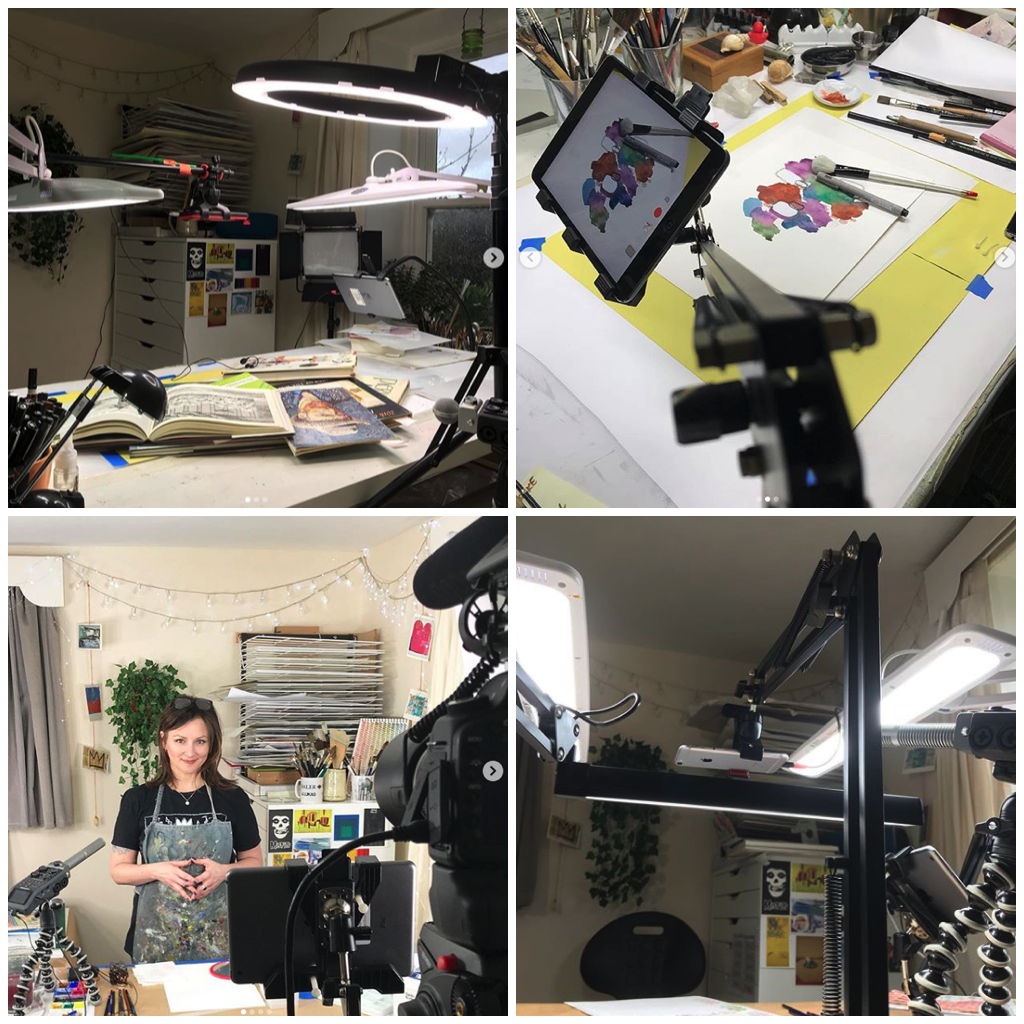
Royalty free music is readily available online from more sources than I can possibly list, but I tend to use what is built into iMovie, or found through Incomptech.com. I have meant to try the YouTube audio library but haven't yet. It's massive. One day...I tend to put a lot of BTS (behind the scenes) photos of when I'm filming on my Instagram, so following me there might be useful to you. You'll see the cameras, lights, audio equipment, some editing shots and more. I'll pop a few photos here (at the bottom), but scroll my Instagram for more.
Angles- how to film top-down and more:
So I mentioned I use an iPhone and an iPad for most of my filming. My iPad is typically attached to an angle poise arm attached to the left of my desk and pointed low and down at my hand/paper for close-up/detail footage. My top-down set-up has changed over the years, but mostly because I like having things that are easy to tear down when production ends. For more than two years I used an old boom mic stand at a right angle over my work, with a simple and cheap bike handlebar smartphone clamp attached to it, pointing my phone down. This is super simple and keeps your phone from wobbling whilst filming. I have recently switched to an angle poise phone arm, and while I love its simplicity, it will wobble if I bump my desk during the demonstration (or erase vigorously). I like it, but may go back to the other solution.These angle poise arms are plentiful from places like eBay or Amazon, and you'll likely spend between £10-£20 for one.
Title graphics and other stills:
I have some ability in a variety of what used to be known as "desktop publishing" applications. Maybe they're still called that (I've been out of the biz for years), but what I do for my classes is make the 16:9 format blank document in (used to use Photoshop, but no longer) Serif Affinity Photo, then add layers for each text still or transition slide that I require. I create an eye-catching cover graphic for the whole video, and I make sure it is still legible at thumbnail size for when people scroll lists of videos. This is crucial to getting views.Also, if you are showing subtitles, lists, quotes, or anything that the viewer must read, keep it on screen long enough. You'll need to adjust the time it is visible, probably uniquely for each slide. Practice reading them out loud to get the timing right. Then add more time because there will be people new to the info (or have English as a second language) and at various reading levels. Also consider fading in and out of the overlay text slides to keep stuff looking smooth and professional.
A word about editing styles:
There are so many videos out there that employ "jump cuts" when they could've probably just shot another take to get it right. Jump cuts used en masse are clunky and very current YouTube-y, but I encourage you to create many takes and go as long as you can without breaking up the information on screen. I use very few jump cuts. I like blending my edits in most cases, mostly because I try to avoid making jerky, jumpy videos.
Teleprompters and scripts:
I use both, but not always. I write all of my classes like a book with chapters in an application called Scrivener. I like the way it works and I already had the application. You might be fine handwriting notes, or using Word or similar, but Scrivener is where it's at for me. As far as teleprompters go, I use one only when we're shooting my intro and outro videos and it is my iPad mini 2 with a voice controlled Teleprompter app by MSDC Technologies. It's hard to position the iPad so that it doesn't block the camera lens or look like I'm reading something off-centre, but it's not impossible. Sometimes I go "old school" and print off bits of script and tape them somewhere out of shot but in front of me. Whatever works.
If this article has helped you, I am thrilled and would love you to link to it or - if the generous spirit moves you - throw a tip into my Paypal.me. I know that the info above will help you figure out your best way of doing things, and I truly wish you filming success.If you want to watch my Skillshare classes (all filmed with the stuff I talk about above) then you can grab a FREE trial membership from this little link here.
I'll dump some photos here at the bottom of stuff discussed above. Remember to follow my Instagram for art and BTS when I film.
Thank you for reading and have a great day!Tip me: paypal.me/JenDixonArts
Follow me: Instagram @jendixonarts
Watch me: Skillshare Top Teacher